Is your refrigerator working overtime? Are your energy bills creeping up? Perhaps you’ve noticed the motor is constantly humming or your food isn’t as cold as it should be. Before you assume a major failure, the culprit might be something surprisingly simple: dirty condenser coils.
At Perfect Appliance Repair, we know that routine maintenance is the key to a long and efficient life for your appliances. Cleaning the condenser coils is one of the most effective DIY tasks you can perform to keep your refrigerator in peak condition. This definitive guide will walk you through the why, what, and how of this essential home maintenance task.
Why Cleaning Matters
The condenser coils are a critical component of your refrigerator’s cooling system. Their job is to release heat that has been drawn out of the fridge into the surrounding air. When they become coated in dust, debris, and pet hair, they can’t do their job effectively. This layer of grime acts as an insulator, trapping heat and forcing your appliance to work harder.
This leads to several problems that our technicians see every day:
- Reduced Energy Efficiency: A struggling compressor consumes significantly more electricity, directly impacting your energy bills. The Clean Energy Regulator often points to inefficient appliances as a key source of high household energy consumption.
- Shorter Appliance Lifespan: Continuous overwork causes the compressor—the heart of your refrigerator—to overheat and fail prematurely. This can lead to expensive repairs or even the need for a full replacement.
- Poor Cooling & Food Spoilage: When the coils can’t dissipate heat properly, the refrigerator struggles to maintain a consistent internal temperature. This can lead to warmer spots, causing food to spoil faster and costing you money in wasted groceries.
- Increased Noise: A refrigerator that’s constantly running or a compressor that’s labouring under a heavy load will be noticeably louder.
Assembling Your Toolkit: The Right Tools for the Job
Before you begin, gather the right tools. Having everything on hand makes the process quick and easy.
| Tool/Item | Purpose | Pro Tip |
| Condenser Coil Brush | A long, flexible brush designed to get between the coil fins without causing damage. | While a generic brush can work, specialized tools like the GE Appliances PM14X51 are perfectly designed for the job. |
| Vacuum Cleaner | For removing loosened dust and debris. | Use a soft brush attachment for the coils and a crevice tool for tight spaces and the floor area. |
| Screwdriver | For removing the base grille or back panel. | Check your unit first; you may need a flathead or Phillips head. |
| Safety Gear | To protect yourself. | We recommend gloves to protect from sharp metal fins and a dust mask if the buildup is heavy. |
| Flashlight | To see clearly in dark, tight spaces. | A phone flashlight works perfectly. |
Critical Safety Protocol
Your safety is paramount. Never attempt any appliance maintenance without first disconnecting it from the power source to eliminate the risk of electrical shock.
- Unplug the Refrigerator: Firmly pull the plug from the wall outlet.
- Use the Circuit Breaker: If the outlet is inaccessible, go to your home’s fuse box or circuit breaker and switch off the power to the refrigerator’s circuit.
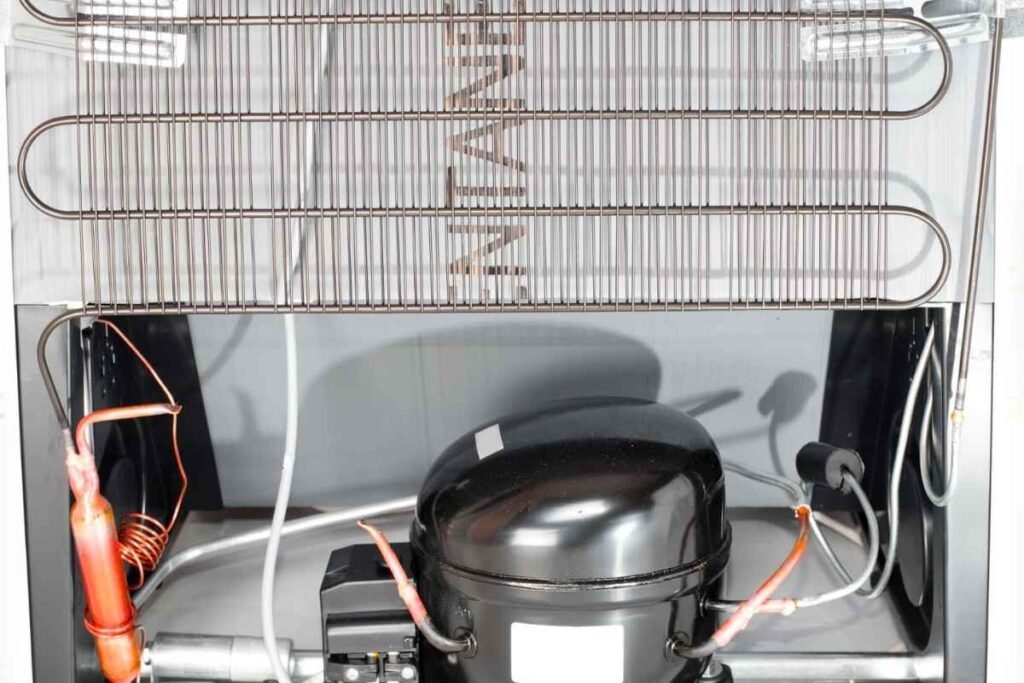
Step 1: Locating the Condenser Coils (A Visual Guide)
Not all refrigerators are built the same. The location of your condenser coils will depend on your model’s age and design.
- Bottom-Front Coils: The most common placement on modern refrigerators. The coils are located behind a base grille or kickplate at the very bottom of the unit. This panel usually snaps off or is held by a few screws.
- Rear-Mounted Coils: Typically found on older models. These large, black, grid-like coils are visible on the back of the refrigerator. You will need to carefully pull the appliance away from the wall to access them.
- The “NeverClean™ Condenser” Exception: Some brands, most notably GE Appliances, feature a NeverClean™ Condenser. These coils are encased within the refrigerator walls and are designed to not require cleaning for the life of the appliance. Check your owner’s manual if you suspect you have this type. Attempting to access them can damage your refrigerator.
Step 2: The Cleaning Process (Model-Specific Instructions)
Follow the steps that correspond to your coil location.
For Bottom-Front Coils:
- Remove the Base Grille: Open the refrigerator doors. Most grilles will unsnap if you push in at the top and pull out at the bottom. Consult your owner’s manual if you’re unsure.
- Use the Coil Brush: Gently insert the condenser coil brush between the fins. Move it back and forth to loosen years of built-up dust, lint, and pet hair.
- Vacuum Debris: Use your vacuum with the soft brush attachment to suck up all the loosened debris from the coils. Switch to the crevice tool to clean the condenser fan (you’ll see it next to the coils) and the floor area.
- Clean and Replace: Wipe the base grille clean with a damp cloth before snapping it back into place.
For Rear-Mounted Coils:
- Move the Refrigerator: Carefully pull the unit straight out from the wall to avoid scratching your floors and to ensure you have ample space to work.
- Brush Downwards: Take your coil brush and sweep downwards along the grid of coils. Dust and webs will fall to the floor.
- Vacuum Thoroughly: Use your vacuum to clean the coils and then vacuum the floor behind and underneath the refrigerator before carefully pushing it back into position.
Step 3: Reassembly and Power-Up
Once the coils are clean and any panels are securely reattached, wait 5-10 minutes for the system’s pressures to equalize. Then, you can safely plug the refrigerator back in or flip the circuit breaker on. You should hear the compressor start up within a few minutes.
Establishing a Maintenance Schedule
Regular cleaning is the key to preventing major issues. We recommend the following schedule:
- Standard Households: Clean the coils every 6 to 12 months.
- Households with Pets or High Dust: If you have pets that shed or live in a dusty environment, you should clean the coils every 2 to 3 months.
By following this guide, you can improve your refrigerator’s performance, lower your energy costs, and extend its service life. However, if you’ve cleaned the coils and your refrigerator is still not cooling properly or is making unusual noises, it may be a sign of a more serious issue.
Don’t hesitate to call the experts. Contact Perfect Appliance Repair today for professional diagnostics and service.