There are few things more frustrating in the kitchen than a refrigerator that won’t cooperate. When your ice maker stops making ice just before a summer barbecue, or the water dispenser trickles out when you need a cold drink, it’s often due to one small but vital component: the water inlet valve.
The water inlet valve is the gatekeeper for all water entering your refrigerator. When it fails, it can cause leaks, low water pressure, or stop the flow entirely. While it may sound technical, replacing this valve is a common repair that a confident DIYer can handle.
This guide from Perfect Appliance Repair will walk you through everything you need to know, from diagnosing the problem to completing the replacement safely.
Is It Really the Water Inlet Valve?
Before you start unscrewing panels, let’s make sure the valve is the true culprit. These common issues can mimic a faulty valve and are much simpler to fix.
- Check the Water Filter: A clogged or old water filter is the most common cause of a slow water dispenser. If it’s been more than six months since you last changed it, replace the filter first and see if the flow improves.
- Inspect the Water Supply Line: Gently pull your fridge away from the wall and check the plastic water line behind it. Is it kinked or bent? Is there any visible ice clogging the line? A frozen line can be thawed carefully with a hairdryer on a low setting.
- Check the Ice Maker Bail Arm: If your ice maker has a metal arm, ensure it is in the “down” or “on” position. If the arm is locked upwards, it signals to the ice maker that the bin is full, and it will stop producing ice.
If you’ve checked these and the problem persists, the water inlet valve is the most likely cause.
Getting Started
A successful repair starts with proper preparation. This ensures your safety and makes the job go smoothly.
Safety First: A Critical Warning
Before you begin any work, you must disconnect your appliance from power and water to prevent the risk of electric shock or serious water damage.
- Disconnect Power: Unplug the refrigerator from the power point at the wall. Do not rely on simply turning it off from the front panel.
- Shut Off Water Supply: Find the small shut-off valve connected to your fridge’s water line. This is often under the kitchen sink or behind the refrigerator. Turn the valve clockwise until it is fully closed.
Gather Your Tools and Parts
Having everything on hand before you start will save you time and frustration. You will need:
- An adjustable wrench or a set of pliers
- A screwdriver (usually a Phillips head or ¼-inch nut driver)
- A bucket and a few old towels to catch residual water
- Your new, compatible water inlet valve
To get the right part, locate your refrigerator’s model number on the compliance plate, which is usually found on an inside wall of the fridge compartment. You can then order the precise valve needed for your appliance.
Step-by-Step Guide
With your tools and parts ready and safety checks complete, you can begin the replacement.
Step 1: Access the Old Valve
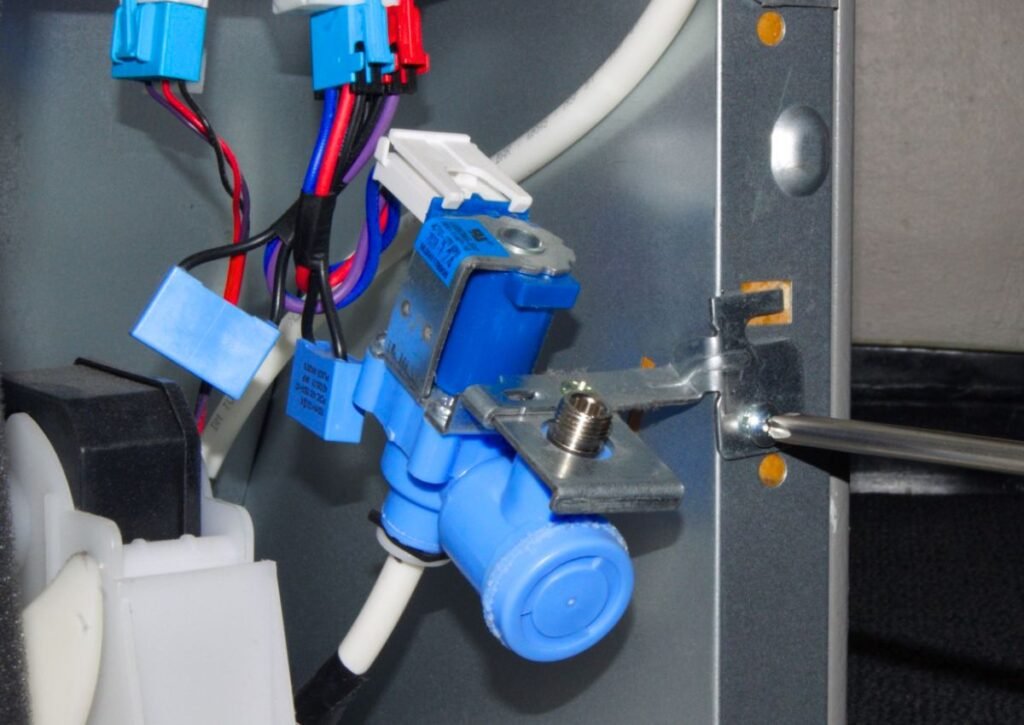
First, carefully pull your refrigerator straight out from the wall to give yourself enough space to work behind it. The water inlet valve is located on the lower back portion of the unit. It is typically covered by a thin rear access panel made of cardboard or metal, which is held in place by several screws.
Use your screwdriver or nut driver to remove all the screws securing this panel and set it aside. The water inlet valve is the part where the main water supply line connects to the fridge.
Step 2: Disconnect the Water Lines and Wires
Place your towels and a bucket under the valve area.
- Main Water Line: Use your wrench to unscrew the compression nut that connects your home’s water supply line to the valve. Have a towel ready for drips.
- Internal Tubing: The valve will have one or two plastic tubes leading from it into the refrigerator (one for the dispenser, one for the ice maker). To disconnect these, either press in on the surrounding collar while pulling the tube out (for quick-connect fittings) or unscrew the compression fitting.
- Electrical Connectors: Before you disconnect the wires, take a quick photo with your phone. This will be your reference for reconnecting them correctly. Gently but firmly pull the electrical harnesses off the solenoid terminals. Do not pull on the wires themselves.
Step 3: Remove the Old Valve
The old valve is usually secured to the refrigerator frame with one or two mounting screws. Use your screwdriver to remove these screws, and the valve assembly will now be free.
Step 4: Install the New Valve
Mount your new water inlet valve onto the refrigerator frame and secure it with the mounting screws you just removed.
- Reconnect Wires: Using the photo you took earlier as a guide, push the electrical harnesses firmly onto the terminals of the new valve.
- Reconnect Tubing: Push the plastic water tubes firmly into the new valve’s ports until they snap securely in place. Give them a gentle tug to ensure they are seated properly and won’t leak.
The Final Checks
This is the most important part of the job – ensuring everything is working correctly and leak-free.
- Reconnect the Main Water Supply: Screw the main water supply line back onto the new valve’s inlet port. Tighten it with your wrench until it is snug, but be careful not to overtighten and crack the plastic.
- Slowly Turn the Water On: Go to your shut-off valve and turn the water back on slowly. Immediately inspect every connection point on the new valve for any drips or leaks. If you see any, turn the water off and tighten the leaking connection slightly.
- Restore Power: Once you are confident there are no leaks, plug the refrigerator back into the power point.
- Purge and Test: Dispense water from the fridge door for at least a minute to flush out any air from the lines. You may hear sputtering at first—this is normal. Allow up to 24 hours for the ice maker to cycle and begin producing ice.
- Final Assembly: If all is well, re-install the rear access panel with its screws. Carefully slide your refrigerator back into place, ensuring you don’t kink the water line behind it.
Feeling Overwhelmed?
Congratulations on completing the repair! However, if you’ve read through these steps and feel hesitant, or if you’ve encountered a problem you can’t solve, it’s always best to call a professional. A small mistake can lead to significant water damage or electrical issues.
For homeowners in the Sydney area, Perfect Appliance Repair is here to help. Our qualified technicians can diagnose the problem with certainty and perform a fast, reliable replacement with guaranteed parts and workmanship.
Don’t let a small part cause a big headache.
Frequently Asked Questions (FAQ)
Q: How long does it take to replace a refrigerator water inlet valve?
A: For a first-time DIYer, set aside about 30-45 minutes to complete the job. An experienced technician can often complete it in under 20 minutes.
Q: Can a faulty valve cause my fridge to make a humming or buzzing noise?
A: Yes. If the valve is trying to open but is stuck or clogged, the solenoid may produce a loud buzzing or humming sound as electricity flows through it without the valve being able to actuate.
Q: My water dispenser works, but the ice maker doesn’t. Could it still be the valve?
A: It could be. Many refrigerators use a dual solenoid valve, with one side controlling water for the dispenser and the other for the ice maker. It’s possible for just one of these solenoids to fail, which would affect only one function.