There’s nothing more frustrating than pulling a beautiful cake out of the oven only to find it’s burnt on the outside and raw in the middle. Or perhaps that Sunday roast you’ve been looking forward to is still pink after hours of cooking. Before you blame the recipe, consider this: your oven might be lying about its temperature.
At Perfect Appliance Repair, we know that an inaccurate oven can ruin meals and cause endless frustration for Sydney home cooks. The most common culprit for this heating chaos is a small but critical component: the oven temperature sensor.
This definitive guide will walk you through the entire process of diagnosing, testing, and replacing a faulty oven sensor. We’ll empower you with the knowledge to tackle this job with professional-level confidence, so you can get back to cooking perfectly baked and roasted meals every time.
What Is an Oven Temperature Sensor?
Think of the oven temperature sensor as your oven’s dedicated thermometer. It’s a type of resistor called a thermistor, which means its electrical resistance changes in precise response to the oven’s internal temperature.
This sensor constantly sends resistance signals back to the oven’s main control board (its “brain”). The control board reads these signals and, based on the temperature you’ve set, decides when to turn the bake or broil elements on or off to maintain accurate heat. Its job is crucial for both the preheating cycle and maintaining a stable temperature throughout cooking. When it fails, your oven is essentially cooking blind.
Is Your Oven Sensor Faulty? Key Symptoms to Watch For
A failing temperature sensor will almost always leave clues. If you notice any of the following, the sensor should be your primary suspect:
- Inconsistent Cooking Results: Your food is frequently burnt, undercooked, or cooked unevenly, even when following recipes perfectly.
- Extended Preheat Times: The oven takes much longer than usual to signal that it has reached the set temperature.
- Wild Temperature Swings: You notice the heating elements turning on and off far too frequently or not often enough, leading to erratic heat.
- Digital Error Codes: Many modern ovens will display specific fault codes when the sensor fails. Look out for codes like F2, F3, or F4, which commonly indicate an issue with the sensor circuit.
- Self-Clean Cycle Malfunctions: The self-clean cycle requires precise temperature control. A faulty sensor may prevent the cycle from starting or completing correctly.
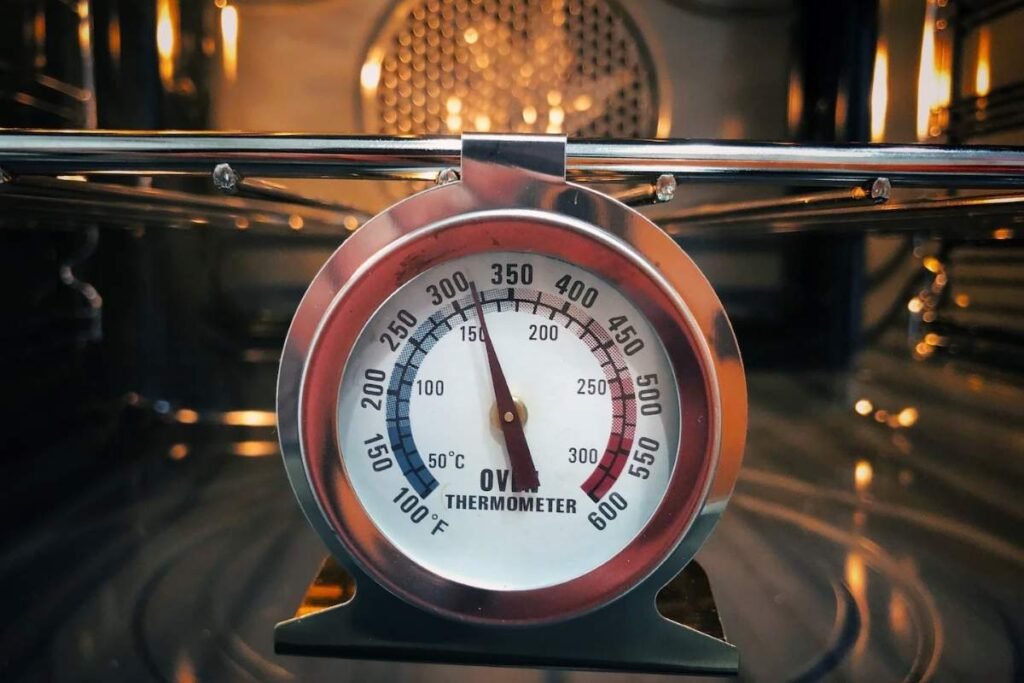
The 5-Minute Thermometer Confirmation Test
Before you reach for any tools, it’s essential to confirm that your oven has a temperature problem. This quick, non-invasive test will give you a clear answer.
- Get a Reliable Oven Thermometer: These are inexpensive and available at most supermarkets or kitchen supply stores in Sydney.
- Position it Correctly: Place the thermometer on the centre rack in the middle of the oven. This spot gives the most accurate reading, away from the direct heat of the elements.
- Set the Temperature: Turn your oven to a standard baking temperature, like 180°C (about 350°F).
- Wait and Stabilise: Allow the oven to complete its preheat cycle. Once it beeps, wait another 15-20 minutes for the internal temperature to fully stabilise.
- Check the Reading: Turn on the oven light and check the thermometer reading through the door. If you must open the door, do it quickly. A difference of more than 15-20°C indicates a problem with either the sensor or the oven’s calibration.
Tools and Safety
With the problem confirmed, it’s time to gather your tools. Safety is non-negotiable when working with appliances.
SAFETY FIRST!
- Disconnect All Power: Unplug your oven from the power point at the wall. For hardwired ovens, switch off the corresponding breaker in your home’s circuit box.
- Ensure the Oven is Cool: Never work on an oven that is still warm.
- Wear Work Gloves: The inside and back of an oven can have sharp metal edges.
Tool Checklist
- Multimeter (with an Ohms (Ω) setting)
- Oven Thermometer
- 1/4-inch Nut Driver or a Socket Set
- Phillips Head Screwdriver
- Needle-Nose Pliers (for stubborn electrical connectors)
- Your Smartphone (to take photos of wiring before disconnecting—a pro tip!)
The Definitive Sensor Test
This is the definitive test to confirm a faulty sensor.
(Visual Aid Suggestion: A short, clear video or GIF showing a technician performing this multimeter test would be highly effective here.)
Step 1: Locate the Sensor
Open your oven door and look inside. The temperature sensor is a thin, pencil-like metal probe, usually 15-20 cm long. It’s almost always located at the top back of the oven cavity, either on the left or right side, held in place by one or two screws.
Step 2: Remove the Sensor
Unscrew the mounting screws holding the sensor. Gently pull the sensor probe into the oven cavity. You will find it is attached to a wiring harness. In many models, you can simply unplug the harness from inside the oven.
Important Note: On some ovens, the connection is on the outside back panel. You will need to carefully pull the oven away from the wall to access the back panel, remove it, and disconnect the wiring harness there.
Step 3: Perform the Resistance Test
- Set your multimeter dial to measure resistance (Ohms, Ω). Choose the 2kΩ or 20kΩ setting if available.
- Touch the two probes of your multimeter to the two metal prongs on the sensor’s connector.
- Observe the reading. Here’s what it means:
- The Gold Standard: At room temperature (around 20-25°C), a healthy sensor will show a resistance reading of approximately 1080 to 1100 Ohms.
- The Diagnosis:
- Correct Reading (~1100 Ω): Your sensor is likely functioning correctly. The issue may be the oven’s calibration or another component (see our troubleshooting table below).
- Infinite Resistance (“OL” or “1”): This means the sensor circuit is “open.” The sensor is broken and needs replacement.
- Zero or Very Low Resistance: This means the sensor is “shorted.” The sensor is broken and needs replacement.
A Step-by-Step Replacement Guide with Visuals
If the multimeter test confirms a faulty sensor, the replacement is straightforward.
(Visual Aid Suggestion: A series of numbered, high-quality photos corresponding to each step below.)
- Sourcing the Correct Part: Your oven’s model number is crucial. It’s usually found on a sticker around the oven door frame. Use this number to order the exact OEM (Original Equipment Manufacturer) or a high-quality compatible replacement sensor. If you’re unsure, the team at Perfect Appliance Repair can source the correct part for you.
- Disconnecting the Old Sensor: Following the removal steps from the test above, fully remove the old sensor and its wiring.
- Installing the New Sensor: Plug the new sensor’s wiring harness into the oven’s connector—it should click securely into place. Gently feed the probe back into the oven cavity and fasten it with the mounting screws.
- Final Verification: Restore power to your oven. Repeat the oven thermometer test at 180°C to confirm that the new sensor has solved the temperature accuracy issue.
What If It’s Not the Sensor?
If your sensor tests fine but the temperature is still wrong, one of these other components may be at fault.
| Symptom | Potential Cause | Quick Diagnostic Tip |
| Oven heats, but not enough or too slowly | Weak or Faulty Bake Element | With the power off, visually inspect the bottom element for blisters, cracks, or glowing hot spots. A technician can test it for continuity. |
| Food burns on top, but is undercooked elsewhere | Faulty Broil Element | Visually inspect the top element for damage. It should glow bright red during the broil cycle. |
| Oven won’t heat at all (Gas Ovens) | Weak or Faulty Igniter | Watch and listen when you turn the oven on. A healthy igniter glows brightly and you should hear the whoosh of gas igniting within 90 seconds. If it glows weakly or takes longer, it’s failing. |
| Temperature is wildly erratic or won’t turn off | Defective Control Board | This is the oven’s main computer. As it controls all functions, a fault here often requires a professional diagnosis to rule out other issues. |
| Temperature is consistently off by the same amount | Calibration Required | If your oven is always 15°C cooler than the set temperature, it may simply need to be recalibrated. Refer to your owner’s manual for specific instructions, as the process varies by brand. |
How to Extend the Life of Your Oven and Its Sensor
- Clean Carefully: Avoid spraying oven cleaner or other harsh chemicals directly onto the temperature sensor.
- Limit the Self-Clean: The extreme heat of self-clean cycles puts a lot of stress on all oven components, including the sensor. Use it sparingly.
- Be Mindful of Placement: When placing or removing large baking trays or roasting pans, be careful not to bump or bend the sensor probe.
Frequently Asked Questions (FAQ)
- How much does an oven temperature sensor cost in Sydney?
The sensor itself is usually an affordable part. However, if you hire a professional, the cost will include the service call-out fee and labour. Contact Perfect Appliance Repair for a clear, upfront quote with no hidden fees. - Can I still use my oven if the temperature sensor is broken?
It’s not recommended. You won’t be able to trust the temperature, leading to wasted food and potentially unsafe cooking conditions if food is undercooked. - What does an F3 error code mean on my oven?
An F3 error code on most oven brands (including Westinghouse, Chef, and others common in Australia) almost always points directly to a faulty or “open” temperature sensor circuit, confirming it needs to be tested and likely replaced. - How long does it take to replace an oven temperature sensor?
For a first-time DIYer, allow 30-60 minutes. Our experienced technicians at Perfect Appliance Repair have the tools and expertise to complete the job much faster, ensuring it’s done right the first time.
Get It Repaired Perfectly
While replacing the sensor is a manageable task for many, we understand it’s not for everyone. If you’re not comfortable using a multimeter, if the problem appears to be a more complex component like the control board, or if you simply want the peace of mind that comes with a guaranteed professional repair, our team at Perfect Appliance Repair is here to help.
We serve all of Sydney and its surrounding suburbs, providing fast, reliable, and guaranteed oven repairs for all major brands. Contact us today for an upfront quote and get your oven heating accurately again