Is the peace and quiet in your kitchen now dominated by a loud humming, grinding, or squealing from your range hood? A faulty fan motor is more than just an annoyance; it’s a sign that your kitchen’s most important ventilation tool isn’t doing its job of removing smoke, airborne grease, and cooking odours.
A worn-out fan motor is one of the most common failures in a range hood. While it may sound like a complex job, replacing it can be a manageable DIY project for the handy homeowner. This guide, brought to you by the experts at Perfect Appliance Repair, will walk you through every step of replacing the fan motor yourself. We’ll also help you decide if a DIY repair is right for you, or if it’s time to call in a professional.
Critical Diagnosis: Are You Sure It’s the Motor?
Before you order a new part, it’s crucial to confirm that the motor is actually the problem. Running through these quick diagnostic steps can save you time and money.
Check for Obstructions: First, cut the power to your range hood at the circuit breaker. Remove the grease filters so you can see the fan blades. Carefully try to spin the blades by hand (we recommend wearing gloves). Do they spin freely, or do they scrape against the fan housing? If you hear scraping, the motor may have simply shifted on its mount. Sometimes, gently nudging the motor assembly back into its central position can resolve the noise.
Inspect for Grease Buildup: Decades of kitchen grease can accumulate on the fan blades, causing them to become unbalanced. This imbalance forces the motor to work harder and can create a loud, rhythmic humming or rattling sound. A thorough cleaning of the fan blades may solve the issue.
Lubrication vs. Replacement: The type of noise is your biggest clue.
A high-pitched squeal: This often indicates the motor’s bearings are dry. While applying a suitable spray lubricant can quiet it down temporarily, this is often a short-term fix. The noise will likely return as the motor is on its last legs.
A deep humming or grinding: This is the classic sign of a failing motor. The bearings are worn out, and no amount of lubricant will fix it. Replacement is the only permanent solution.
If your fan doesn’t spin at all, the issue could be the motor, the switch, or a faulty control board. However, if the fan is noisy and inefficient, the motor is the primary suspect.
Safety First & Essential Tools: A Technician’s Checklist
Working with any appliance that combines electricity and moving parts requires a focus on safety.
Safety is Not Optional:
De-energise the Unit: Do not just turn the range hood off at its switch. Go to your home’s circuit breaker box and flip the breaker that powers your kitchen appliances. A good practice is to leave a note on the panel so no one accidentally turns it back on while you’re working.
Verify Zero Power: Use a voltage tester on the wires leading into the range hood unit to confirm there is absolutely no electrical current.
Australian Standards: Always perform work in accordance with Australian electrical safety standards. If you are ever unsure or uncomfortable with any step, it is always safer and more cost-effective in the long run to contact a licensed technician.
Tool & Materials List:
Gathering everything you need before you start makes the process smooth and efficient.
Required Tools:
Screwdriver set (including Phillips and flathead bits)
Socket set or an adjustable wrench
Wire strippers
Voltage tester (non-negotiable for safety)
Needle-nose pliers
Protective work gloves
Headlamp or a good flashlight
Required Materials:
The correct OEM (Original Equipment Manufacturer) fan motor for your range hood model. You can find the model number on a sticker inside the unit, usually visible when you remove the filters. Using a generic part can lead to poor performance or electrical issues.
Wire connectors (wire nuts) of the appropriate size.
Electrical tape.
The Step-by-Step Replacement Guide
With your tools gathered and safety checks complete, it’s time to begin.
Part 1: Accessing the Motor
Remove Filters and Grilles: Unclip the metal grease filters and set them aside. This is also a great time to clean them. If there is a metal or plastic grille covering the fan blades, unscrew and remove it.
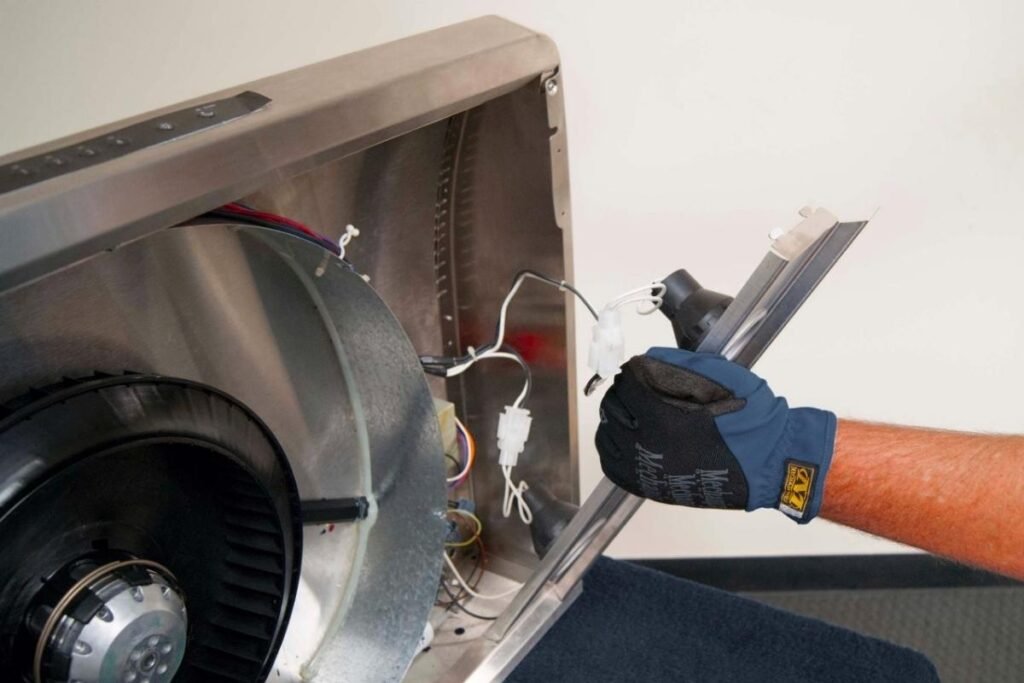
Take a Photo Now: This is a pro-tip that can save you a huge headache. Before you disconnect a single wire, take a clear photo with your smartphone showing exactly how the wires from the motor are connected. Note which colour wire goes to which connection point.
Disconnect the Wiring: Carefully unplug the wiring harness if your model has one. If the wires are connected individually, use your pliers to remove the wire nuts and separate the connections.
Part 2: Removing the Old Motor Assembly
Unscrew the Mounting Bracket: The fan motor is held in place by a metal mounting bracket. Locate the screws holding this bracket to the range hood’s frame and remove them. The entire assembly (motor and blade) may now be loose, so hold it with one hand as you remove the final screw.
Separate the Fan Blade: With the assembly removed, place it on a stable work surface. The fan blade is attached to the central motor shaft. Look for a nut or a small set screw on the hub of the blade. Use your wrench or screwdriver to loosen and remove it.
Remove the Blade and Motor: Gently slide the fan blade off the motor shaft. It might be tight due to grease buildup, so a bit of wiggling may be required. Once the blade is off, you can unbolt the old motor from its mounting bracket.
Part 3: Installing the New Motor
Mount the New Motor: Secure your new OEM motor to the mounting bracket using the same bolts you just removed. Ensure it is oriented in the same direction as the old one.
Attach the Fan Blade: Slide the fan blade onto the shaft of the new motor. Re-install and tighten the nut or set screw to secure it. Don’t over-torque it, but make sure it is snug.
Critical Check: Manually spin the fan blade now. Ensure it spins smoothly and doesn’t scrape against the mounting bracket or any part of the housing. This simple check prevents post-installation noise and potential motor strain.
Reconnect the Wiring: Mount the new assembly back into the range hood. Referring to the photo you took earlier, reconnect the wires. Secure them firmly with the wire nuts. Gently tug on each wire to ensure the connection is solid. For extra safety, wrap the base of each wire nut connection with electrical tape.
Part 4: Reassembly
Re-secure the mounting bracket to the range hood frame.
Re-install any protective grilles.
Clip the clean grease filters back into place.
The Final Check & First Run
The moment of truth.
Go back to your circuit breaker box and restore power to your kitchen appliances.
Return to the range hood and test the fan, starting on the lowest setting and cycling through to the highest. Listen for smooth, quiet, and powerful operation.
Test the range hood lights to ensure they were not disturbed during the repair.
Troubleshooting Tip: If the fan fails to turn on, immediately cut the power at the breaker. The most likely culprit is a loose connection. Re-open the unit and carefully double-check your wiring against your photo.
When to Call the Professionals at Perfect Appliance Repair
Completing a DIY repair is incredibly satisfying, but it’s equally important to know your limits. Your time and safety are valuable, and some jobs are best left to a trained professional.
Consider this the smart, safe choice, not a failure. It’s time to call an expert if:
You are at all uncomfortable or inexperienced working with electricity.
The wiring in your range hood looks old, frayed, cracked, or more complex than you anticipated.
After correctly replacing the motor, the fan still doesn’t work. The issue may lie with the control switch or a more complex electronic control board.
You cannot confidently identify and source the correct OEM motor for your specific range hood model.
If any part of this process feels overwhelming, the expert technicians at Perfect Appliance Repair are ready to help. We provide fast, guaranteed range hood repairs across Australia, ensuring the job is done safely and correctly the first time.
Click Here to Book a Service Call with an Expert Technician Today!